Family/Group
Find Family
Access to theFind Family Pageis restricted to users with the system roles of Accountant, Clerk and Health Facility Receptionist or with a role including an access to Insurees and Families/Family/Enquiry.
Pre-conditions
Need to enquire on, or edit a family and/or insurees, policies and contributions associated.
Navigation
Find Family can be found under the main menu
Insurees and Policiessub menuFamilies/Groups
Img. 137 Navigation – Families - Find Family
Clicking on the sub menu
Families/Groupsre-directs the current user to the Find Family Page.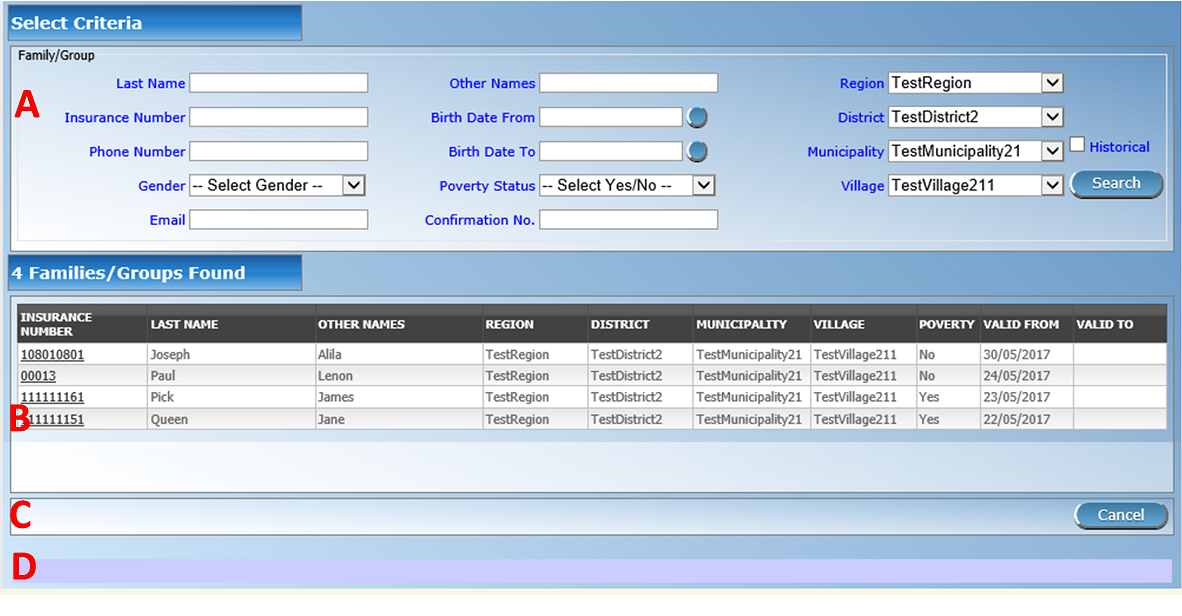
Img. 138 Find Families
The Find Family Page is the first step in the process of finding of a family and thereafter accessing the Family Overview Page of insurees, policies and contributions. This initial page can be used to search for specific families or groups based on specific criteria. The page is divided into four panels (Img. 138):
Search Panel
The search panel allows a user to select specific criteria to minimise the search results. The following search options are available which can be used alone or in combination with each other.
Last NameType in the beginning of; or the full
Last name; to search for families/groups, who’s family head/group headLast name, starts with or matches completely, the typed text.
Other NamesType in the beginning of; or the full
Other Namesto search for families/groups, who’s family head/group headOther Namesstarts with or matches completely, the typed text.
Insurance NumberType in the beginning of; or the full
Insurance Numberto search for families/groups, who’s family head/group headInsurance Number, starts with or matches completely, the typed text.
Phone NumberType in the beginning of; or the full
Phone Numberto search for families/groups, who’s family head/group headPhone Number, starts with or matches completely, the typed number.
Birth Date FromType in a date; or use the Date Selector Button, to enter the
Birth Date Fromto search for families/groups, who’s family head/group head, has the same or later birth date thanBirth Date From. Note. To clear the date entry box; use the mouse to highlight the full date and then press the space key.
Birth Date ToType in a date; or use the Date Selector Button, to enter the
Birth Date Toto search for families/groups, who’s family head/group head, has the same or earlier birth date thanBirth Date To. Note. To clear the date entry box; use the mouse to highlight the full date and then press the space key.
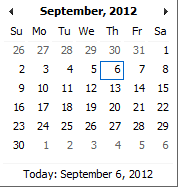
Date Selector ButtonClicking on the
Date Selector Buttonwill pop-up an easy to use, calendar selector (Tab. 17) by default the calendar will show the current month, or the month of the currently selected date, with the current day highlighted.
- At anytime during the use of the pop-up, the user can see the date of today.
- Clicking on today will close the pop-up and display the today’s date in the corresponding date entry box.
- Clicking on any day of the month will close the pop-up and display the date selected in the corresponding date entry box.
- Clicking on the arrow to the left displays the previous month.
- Clicking on the arrow on the right will displays the following month.
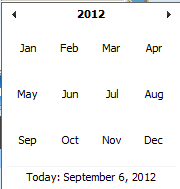
- Clicking on the month will display all the months for the year.
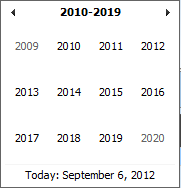
- Clicking on the year will display a year selector.
Calendar Selector - Search Panel
GenderSelect the
Gender; from the list of gender by clicking on the arrow on the right of the selector, to select families/groups, who’s family head/group head is of the specific gender.
Poverty StatusSelect the
Poverty Status; from the list of has poverty status by clicking on the arrow on the right of the selector, to select families/groups that have a specific poverty status.
Type in the beginning of; or the full
Confirmation TypeType in the beginning of; or the full
Confirmation Typeto search for families/groups, who’sConfirmation Type. starts with or matches completely the typed text.
Confirmation No.Type in the beginning of; or the full
Confirmation No.to search for families/groups, who’sConfirmation No.starts with or matches completely the typed text.
RegionSelect the
Region; from the list of regions by clicking on the arrow on the right of the selector to select families/groups from a specific region. Note: The list will only be filled with the regions assigned to the current logged in user. If this is only one then the region will be automatically selected.
DistrictSelect the
District; from the list of districts by clicking on the arrow on the right of the selector to select families/groups from a specific district. Note: The list will only be filled with the districts belonging to the selected region and assigned to the current logged in user. If this is only one then the district will be automatically selected.
MunicipalitySelect the
Municipality; from the list of municipalities by clicking on the arrow on the right of the selector to select families/groups from a specific municipality. Note: The list will only be filled with the municipalities in the selected district above.Select the
Village; from the list of villages by clicking on the arrow on the right of the selector to select families/groups from a specific village. Note: The list will only be filled with the villages in the selected municipality above.
HistoricalClick on
Historicalto see historical records matching the selected criteria. Historical records are displayed in the result with a line through the middle of the text (strikethrough) to clearly define them from current records (Img. 139).
Img. 139 Historical records - Result Panel
Search ButtonOnce the criteria have been entered, use the search button to filter the records, the results will appear in the Result Panel.
Result Panel

Img. 140 Selected record (blue), hovered records (yellow) - Result Panel
The Result Panel displays a list of all families/groups found, matching the selected criteria in the Search Panel. The currently selected record is highlighted with light blue, while hovering over records changes the highlight to yellow (Img. 140). The leftmost record contains a hyperlink which if clicked, re-directs the user to the Family Overview Page for the Family selected or if it is an historical record then the Change Family Page, for detailed viewing.
A maximum of 15 records are displayed at one time, further records can be viewed by navigating through the pages using the page selector at the bottom of the result Panel (Img. 141)

Img. 141 Page selector- Result Panel
Button Panel
The
Cancelbutton re-directs to the Home Page.Information Panel
The Information Panel is used to display messages back to the user. Messages will occur once a family/group has been added, updated or deleted or if there was an error at any time during the process of these actions.
Family/Group Overview
Access to the Family Overview Page is restricted to users with the system role of Accountant or Clerk or with a role including an access to Insurees and Families.
Pre-conditions
Need to enquire on, or edit a family/group or manage the insurees, policies and contributions associated with it.
Navigation
Family Overview Page cannot be navigated directly to; the first step is to find the family/group by means of using Find Family Page, Find Insuree Page, Find Policy Page or Find Contribution Page. Once a specific family, insuree, policy or contribution is selected by means of selecting the hyperlink in the Result Panel of the respective Find Page, the user is re-directed to the Family Overview Page.
Family Overview Page
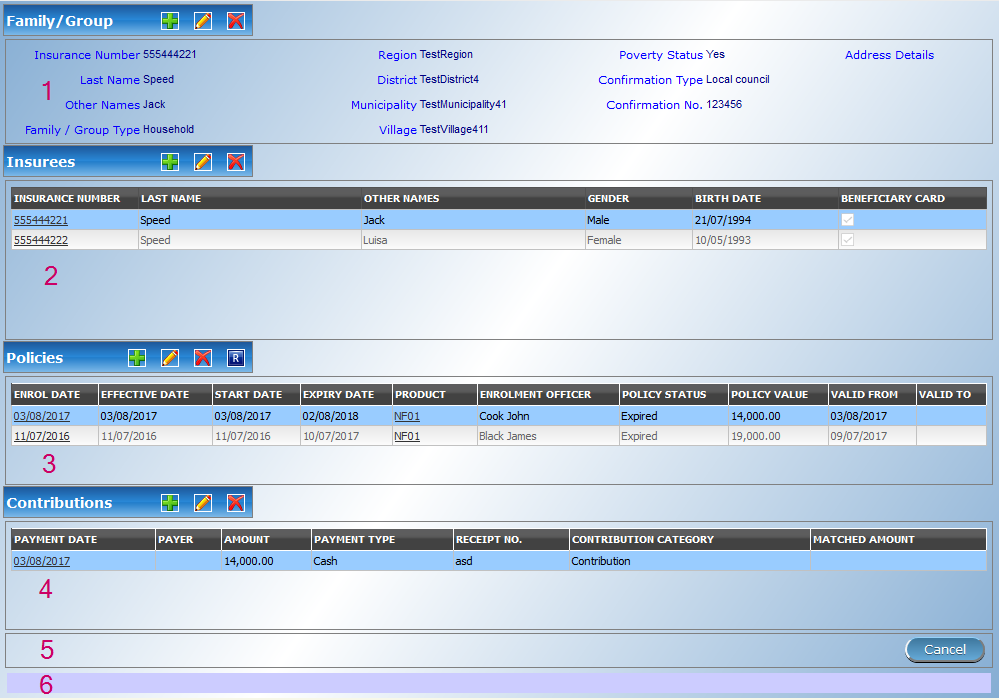
Img. 142 Image - Family Overview Page
The
Family Overview Pageis the central point for all operations with regards to the families/groups, Insurees, policies and contributions associated with it. The page is divided into 6 panels (Image Family overview)
Family /Group Panel
The Family/Group Panel provides information about the family including the Insurance Number and the Last Name and Other Names of the head of family and the District, Municipality, Village and Poverty status of the family. In the Family/Group panel action buttons allow to add, edit and delete the family/group.

Img. 143 Image 114
The
green plus signis for adding a new family/group via the Family/Groupe Page.The
yellow pencil signis for editing a family/group via the Family/Groupe Page.The
red cross signis for deleting a family/group.Insurees Panel
The Insurees Panel displays a list of the insurees within the family/group. The currently selected record is highlighted with light blue, while hovering over records changes the highlight to yellow (Img. 144). The leftmost record contains a hyperlink which if clicked, re-directs the user to the insuree record for editing or detailed viewing.

Img. 144 Selected record (blue), hovered records (yellow) – Insurees Panel
In the Insurees Panel, action buttons allow to add, edit and delete insurees belonging to the family/group.

Img. 145 Image 116
The
green plus signis for adding a new insuree via the Insuree Page.The
yellow pencil signis for editing an insuree via the Insuree Page.The
red cross signis for deleting an insuree .Policies Panel
The Policies Panel displays a list of the policies held by the family/group. The currently selected record is highlighted with light blue, while hovering over records changes the highlight to yellow (Img. 146). The leftmost record contains a hyperlink which if clicked, re-directs the user to the policy for editing or detailed viewing. By default the first policy is selected and therefore in the Contribution Panel, only the contributions paid on that policy will be displayed in the Contribution Panel By selecting another policy in the list, the Contribution Panel, will refresh with the contributions paid on the newly selected policy.

Img. 146 Selected record (blue), hovered records (yellow) - Policy Panel
In the fifth Product column of Policy data grid, there is a link showing product for the policy on the corresponding row. When the link is clicked; a popup browser window (:ref:image118) will open up showing the details of the product (in read-only mode).
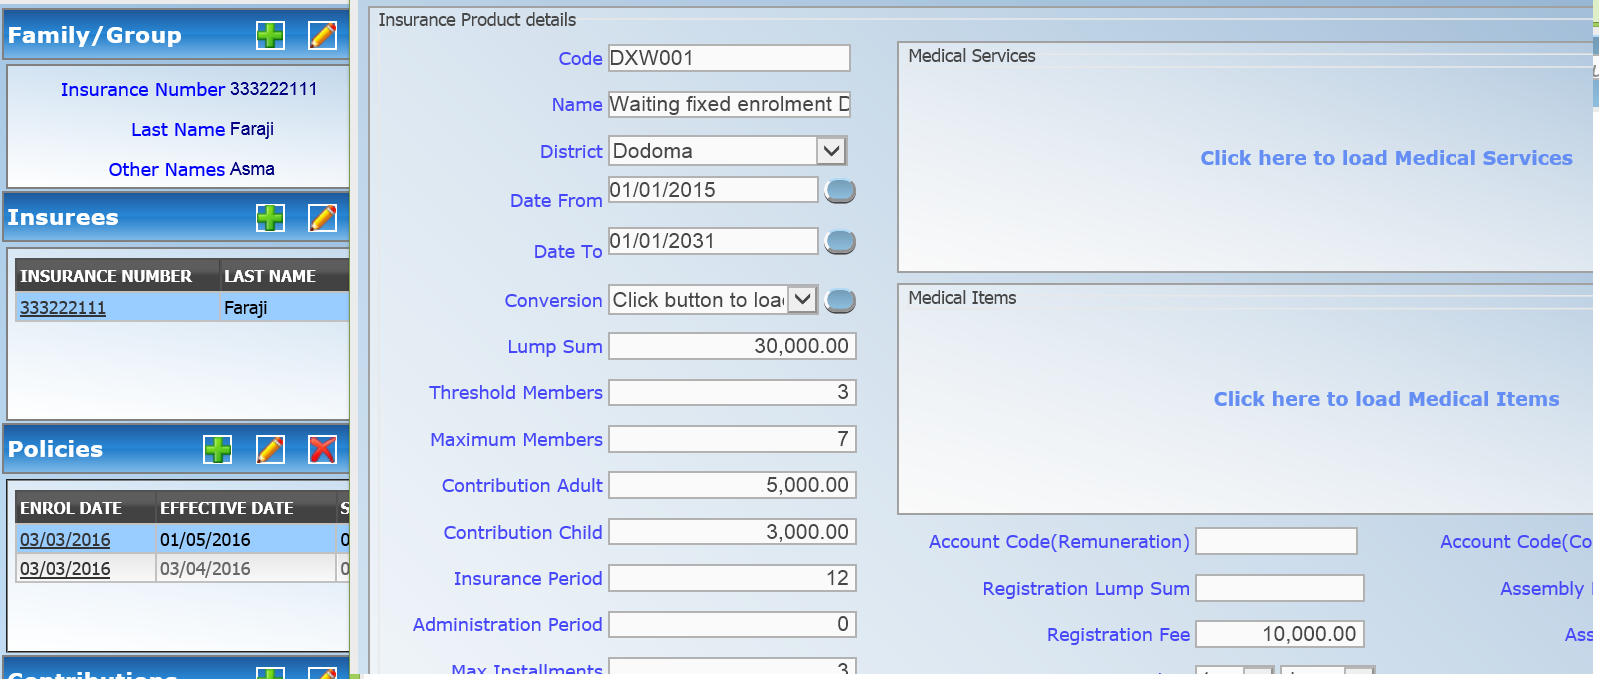
Img. 147 Product Popup – Policies Panel
In the
Policies Panel, action buttons allow to add, edit and delete policies.
Img. 148 Image 119
The
green plus signis for adding a new policy via the Policy Page.The
yellow pencil signis for editing a policy via the Policy Page.The
red cross signis for deleting a policy.The
blue R signis for renewing a policy via the Policy Page.Contributions Panel
The
Contribution Paneldisplays a list of contributions paid on the policy currently selected in thePolicies Panel. The currently selected record is highlighted with light blue, while hovering over records changes the highlight to yellow (Img. 149) The leftmost record contains a hyperlink which if clicked, re-directs the user to the contribution for editing or detailed viewing.
Img. 149 Selected record (blue), hovered records (yellow) - Contributions Panel
In the second Payer column of Contributions data grid, there is a link showing (institutional) payer of the contribution on the corresponding row. When the link is clicked; a popup browser window (Img. 150) will open up showing the details of the payer in read-only mode.
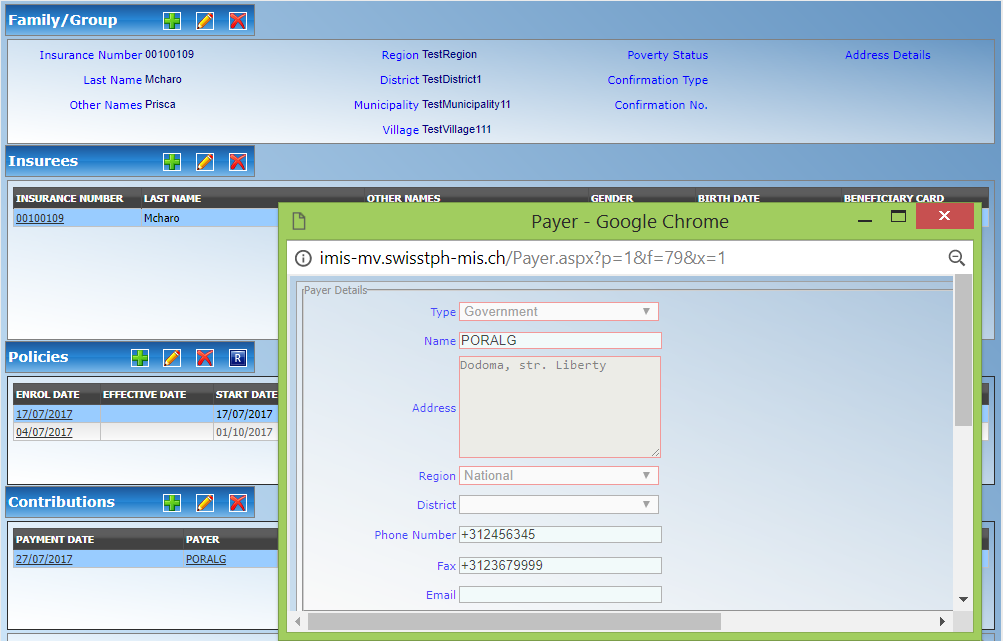
Img. 150 Payer Pop up – Contribution Panel
In the
Contributions Panel, action buttons allow to add, edit and delete contributions.
Img. 151 Image 122
The
green plus signis for adding a new contribution.The
yellow pencil signis for editing a contribution.The
red cross signis for deleting a contribution.Button Panel
The
Cancelbutton re-directs to the Home Page.Information Panel
The Information Panel is used to display messages back to the user. Messages will occur once an insuree, a policy or a contribution have been added, updated or deleted or if there was an error at any time during the process of these actions.
Family/Group Page
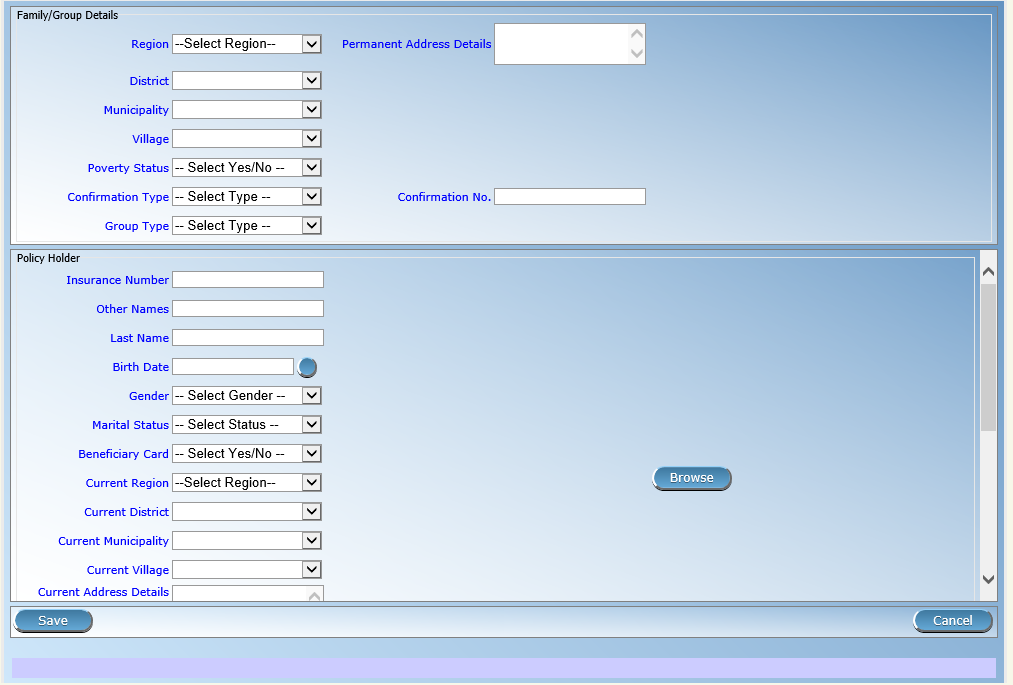
Img. 152 Family/Group Page
RegionSelect from the list of available regions the region, in which the head of family/group permanently stays. Note: The list will only be filled with the regions assigned to the current logged in user. If this is only one then the region will be automatically selected. Mandatory.
DistrictSelect from the list of available districts the district, in which the head of family/group permanently stays. Note: The list will only be filled with the districts belonging to the selected region and assigned to the current logged in user. If this is only one then the district will be automatically selected. Mandatory.
MunicipalitySelect from the list of available municipalities the municipality, in which the head of family/group permanently stays. Note: The list will only be filled with the municipalities belonging to the selected district. Mandatory.
VillageSelect from the list of available villages the village, in which the head of family/group permanently stays. Note: The list will only be filled with the villages belonging to the selected municipality. Mandatory.
Poverty StatusSelect whether the family/group has the poverty status.
Confirmation TypeSelect the type of a confirmation of the social status of the family/group.
Confirmation No.Enter alphanumeric identification of the confirmation of the social status of the family/group.
Group TypeSelect the type of the group/family.
Address Details.Enter details of the permanent address of the family/group.
Insurance NumberEnter the insurance number for the head of family/group. Mandatory.
Last nameEnter the last name (surname) for the head of family/group. Mandatory.
Other NamesEnter other names of the head of family/group. Mandatory.
Birth DateEnter the date of birth for the head of family/group. Note: You can also use the button next to the birth date field to select a date to be entered.
GenderSelect from the list of available genders the gender of the head of family/group. Mandatory.
Marital StatusSelect from the list of available marital statuses the marital status of the head of family/group.
Beneficiary CardSelect from the list of card whether or not an insurance identification card was issued to the head of family/group.
Current RegionSelect from the list of available regions the region, in which the head of family/group temporarily stays.
Current DistrictSelect from the list of available districts the district, in which the head of family/group temporarily stays. Note: The list will only be filled with the districts belonging to the selected region
Current MunicipalitySelect from the list of available municipalities the municipality, in which the head of family/group temporarily stays. Note: The list will only be filled with the municipalities belonging to the selected district.
Current VillageSelect from the list of available villages the village, in which the head of family/group temporarily stays. Note: The list will only be filled with the villages belonging to the selected municipality.
Current Address DetailsEnter details of the temporal address of the head of family/group.
ProfessionSelect the profession of the head of family/group.
EducationSelect the education of the head of family/group.
Phone NumberEnter the phone number for the head of family/group.
Enter the e-mail address of the head of family/group.
Identification TypeSelect the type of the identification document of the head of family/group.
Identification No.Enter alphanumeric identification of the document of head of family/group.
Region of FSPSelect from the list of available regions the region, in which the chosen primary health facility (First Service Point) of the head of family/group is located.
District of FSPSelect from the list of available districts the district, in which the chosen primary health facility (First Service Point) of the head of family/group is located. Note: The list will only be filled with the districts belonging to the selected region.
Level of FSPSelect the level of the chosen primary health facility (First Service Point) of the head of family/group.
First Service PointSelect from the list of available health facilities the chosen primary health facility (First Service Point) of the head of family/group. Note: The list will only be filled with the health facilities belonging to the selected district which are of the selected level.
BrowseBrowse to get the photo for the head of family/group related to his/her insurance number.
Saving
Once all mandatory data is entered, clicking on the
Savebutton will save the record. The user will be re-directed back to the Family Overview Page, with the newly saved record displayed and selected in the result panel. A message confirming that the family member has been saved will appear on the Information Panel.Mandatory data
If mandatory data is not entered at the time the user clicks the
Savebutton, a message will appear in the Information Panel, and the data field will take the focus (by an asterisk).Cancel
By clicking on the
Cancelbutton, the user will be re-directed to the Find Family Page.
Adding a Family
Click on the
Green Plus Signto re-direct to the Family/Group Page.When the page opens all entry fields are empty. See the Family/Group Page for information on the data entry and mandatory fields.
Editing a Family/Group
Click on the Yellow Pencil Sign to re-direct to the Change Family/Group Page
The page will open with the current information loaded into the data entry fields, plus there are options to change the head of the family/group and move an insuree to the family/group.
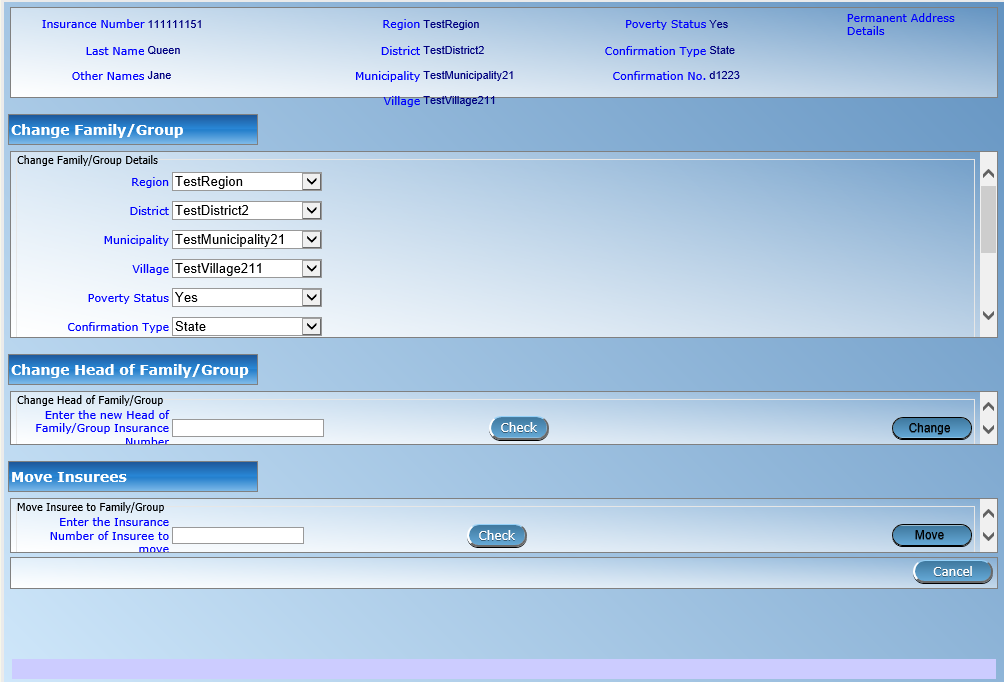
Img. 153 Change Family/Group Page
Changing a Head of Family/Group
The head of the Family/Group is the main contact associated with a policy. For various reasons it may be necessary to change the head of a family/group. The new head must be a head of family in another family.
Enter the insurance number for the new head of family/group, click on check, to confirm that the insurance number is valid and that it really is the person expected. The name will appear to the right of the check button. If all is OK, click on the Change button to complete the change. On a successful change, the user will be re-directed back to the Family Overview Page; the new head will be displayed in the Family/Group Information Panel
Moving an Insuree
Insurees may be moved from one family/group to another. The new insuree must not be a head of family/group in another family/group.
Enter the insurance number for the insuree to move. Click on check, to confirm that the insurance number is valid and that it really is the person expected. The name will appear to the right of the check button. If all is OK, click on the Change button to complete the change. On a successful change, the user will be re-directed back to the Family Overview Page the new insuree will be displayed in the insuree Information Panel.
Deleting a Family/Group
Click on the Red Cross Sign button to delete the currently selected record.
Before deleting a confirmation popup (Img. 154) is displayed, which requires the user to confirm if the action should really be carried out? Deleting of a family requires deleting of all its dependants first.
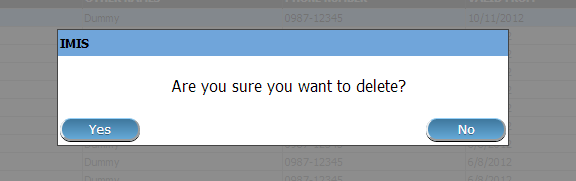
Img. 154 Delete confirmation- Button Panel
When a family is deleted, all records retaining to the deleted family will still be available by selecting historical records.